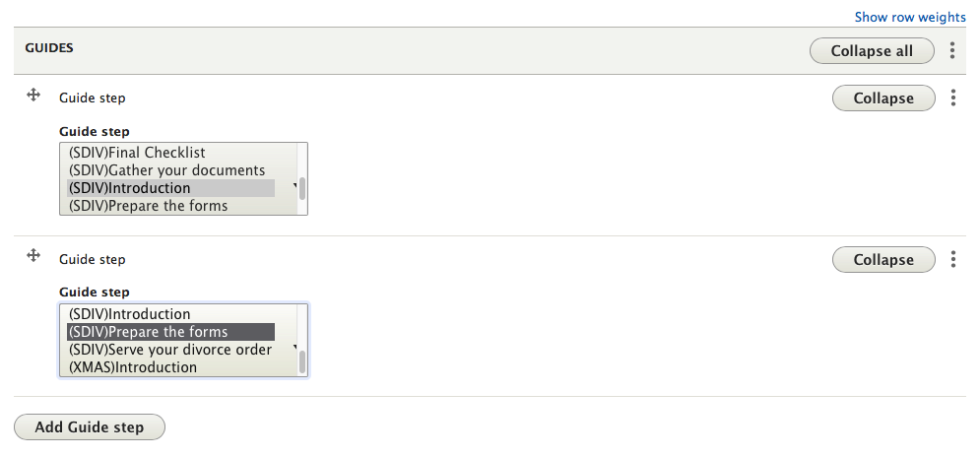
Guides consist of two content types: Guide containers and Guide steps.
The first thing you need to do is to create a page for each step in your guide. Guides should have a maximum of 10 steps, ideally 8 (including the Intro and Final checklist) with max. 3-4 tabs within them. You can use expanders to restructure two steps into one.
Guide steps
So create a guide step, and give it a title. Step names need to be short, so make it shorter if you can.
Four-letter guide identifier
Each step title must start with the guide's four-letter identifier ["(ABCD)Step title"]. The (ABCD) portion will not display to the user. Using the identifier makes it possible to search on just the steps for a particular guide, and lets you easily find the steps in an alphabetical list.
The expander below explains the formula used to determine the guide identifiers, and includes a full list of codes and titles. This list is also available in the project Google Sheet (colloquially, the Boogaloo).
The steps use the standard Paragraphs content blocks, and also allow you to add quick links and an emotional support bubble.
The introduction should contain
- Who this guide is for (and optional who this guide is not for)
- Overview of timeline — we can't build timelines yet[a]
- Overview of fees, if any (most won’t need this)
- Get legal help (suggestion to seek legal advice)
The steps should contain
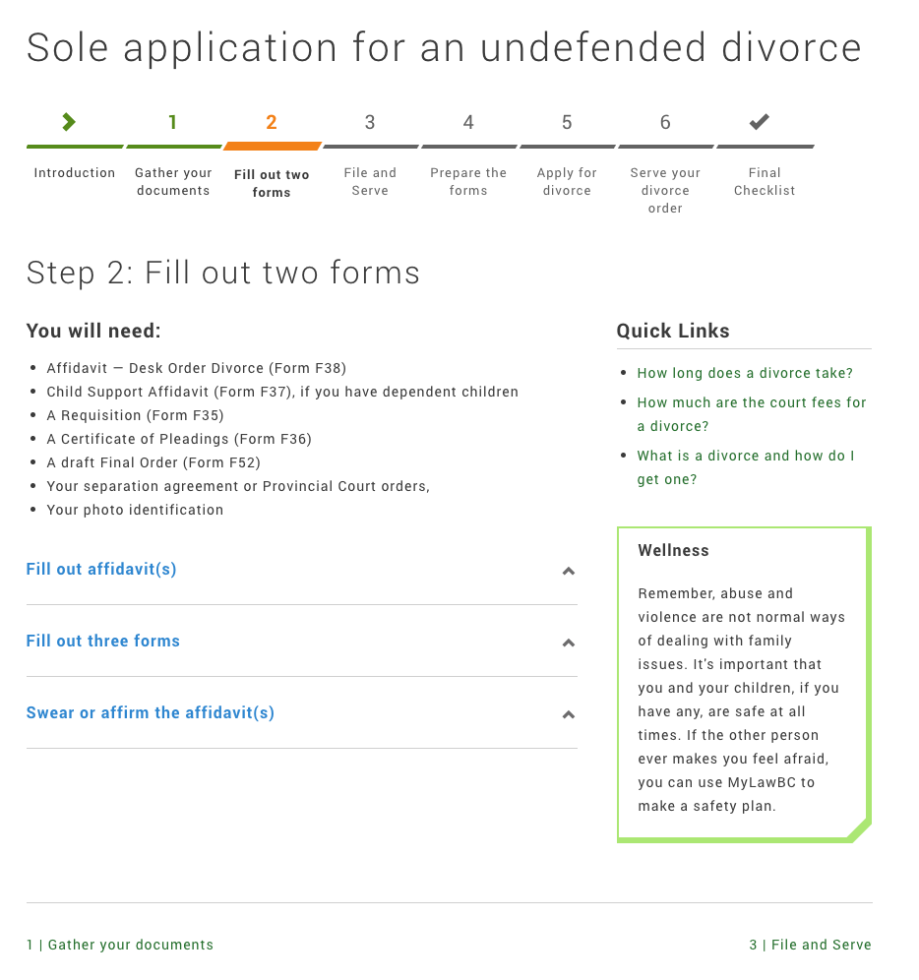
- You’ll need list
- First thing in each step (excluding intro, and maybe the final step)
- Format "You'll need" as H3, with the list as bullets below (caps, no punctuation). — still waiting for confirmation on this from Anne (?) who'll be doing design QC[b]
- Include forms (with a link to the form if blank one is required), money for fees, people (e.g. "Someone to serve your documents on the other person"), etc. See divorce guides for examples.
- Quick links (optional)
- Only add quick links if there is relevant supplementary information that doesn't need to be included in the body text. Try not to repeat links that are in the body (this is OR’s rule, not mine).
- Wellness bubbles
- Try to add at least a few wellness bubbles per guide, if not every page.
- There are some examples you can use (or use as inspiration) here: https://lssbc.teamwork.com/index.cfm#notebooks/203616
Assign each step topic(s) and audience(s). You'll find the identifiers, topics, and audiences here.
Guide container
Once you've created all of your steps, you can now create the Guide Container. This is the is the actual guide page that contains all of the steps. The container name will name the guide (delete "How to" from the title if it has it).
FIrst, you need to find the guide step and select your introduction page from the list. (The first page of each guide won't have a step number, so you must always have an intro page first).
Then click the Add Guide step and select what will be your Step 1. Repeat until you have a list of all your steps in order. You can also drag the steps to re-order them.
Once you've added all the steps, in menu settings, tick Provide a menu link, and give the guide a parent item (usually a sub-landing page). Then publish the page, and you're done! You can go back and edit step, create new ones and add them to a container, or move steps around. The navigation will be set automatically.
Note: every step has a hashed URL (i.e. https://familylaw.lss.bc.ca/guide/guide-name#5), so you can link directly to steps in a guide by copying and pasting the URL.
Copying from Word
If copying text from Word, check the Source view. Even if you've cleaned the formatting, it'll sometimes carry over weird things.
Pay particular attention to:
- Headings — they're often wrapped in <a> tags
- Nested bullets
- Random non-breaking spaces —
- Anything that had a comment bubble over it in Word — after you delete the comment in Drupal, there might still be some stray <div> tags and other weird things that you can't see
If you stripped the formatting in Notepad or using Shift Ctrl V, check that content has <p> tags. It doesn't add them automatically.
Adding a timeline
In the introduction page for more complex guides, there should be a graphical timeline of the steps and timelines required to complete the legal process. The steps represented in the image should match up with the steps in the guide (the top progress bar).
To add a clickable timeline that links to the guide steps, the timeline image will have to be sliced up into individual images for each clickable piece (each step). The image slices need to be uploaded separately.
Required image specs
As recommended by Ana, they should be about 1084 px wide and 200 DPI (possibly with a transparent background?). Ensure they're cropped close to the image edge and don't have extra white padding around the image.
Check that the images are big enough to be clear on a big screen.
In the content block for the Introduction step, select "Add Guide Timeline Group" from the content builder. This will give you fields to add the images.
-
Step to link to: This is the guide step you want this image to link to. If the image shouldn't have a link, leave this field blank. The first page/Introduction page is step 0.
Linking to a non-existent step will result in a blank page, so be sure to test your links after creating the timeline. - Name: Name it "TL-XXXX0", where TL stands for timeline, XXXX is the guide's four-letter identifier, and 0 is the step number to link to. The name is how the image is organized/searchable in the media tab. It won't appear to the user. Give the file the same name before you upload it.
-
Image: Some fields won't appear until you upload the image
-
Alternative text: The alt text should include all of the text on the image.
For example, the alt text for the following image should be:
"Step 4: Prepare the forms (Fill out affidavit(s), Swear / affirm affidavit(s), Fill out three more forms). You have 30 days after swearing your affidavit(s) to file your documents." -
- Image cropping: The image cropping cannot be used for timeline images. Instead, slice up your image before uploading it.
- Show in media library: Uncheck this box. These images are not likely to be re-used elsewhere on the site so don't need to appear in the library. But you will be able to search for them in the library if you need to replace one.
- Click Create media to save.
-
Replacing images in the timeline
Once you've saved the page, the timeline images that you uploaded will save to the Media tab.
If you find a mistake and want to replace one of these images with another, don't remove it on the Introduction page through the Guide Timeline Group (doing so will just upload a second image). Instead,
- go to the Media tab
- search for the image name (TL-XXX0)
- select Edit
- Remove the old image and select the new one
Make sure the alt text is still there.
The image will sync with the guide step automatically. See Media, files, documents.
See the Introduction page on Sole application for an uncontested divorce for an example of a completed timeline.
The finished guide


